


Have you ever seen some pieces of cardboard and envisioned that a robot arm deployed some working robot? Although it seems to be a mere thing sitting around your home or classroom, that is more serious than it appears. It is not a packaging, it is a blank page of invention.
Robot arm prototyping using cardboard is an open method to learn the fundamentals of mechanics, design thinking and no-paper (hand-made) engineering without requiring costly equipment. Over the course of this two-part series I am going to guide you through all the steps you need to follow in order to take a couple of sheets of cardboard and make them into a working robot arm.
No padding, no padding, but firm clear instructions on how to get the idea to reality. Today we will work on the base: materials, design principles, shaping the body and acquiring simple motion. The guide is intended not only for students, but also teachers, hobbyists or the simple tinkerer.
Key Takeaways
- Improving joints and segments strengthens movement and function.
- A gripper turns your arm into a useful tool for grabbing objects.
- Servo motors add precise and automatic motion to cardboard joints.
- Arduino boards make simple coding and control accessible.
- The cardboard prototype is a launchpad to build more advanced models.
Why Cardboard Works So Well
Cardboard is light-weight, has low costs and is simple to cut and surprisingly sturdy, with good techniques. It is also forgiving in that you can alter your design as you go without blowing up your budget as is the case with metal or plastic. It is also inexpensive and easily accessible, hence, ideal when it comes to first time builders. Cardboard prototyping helps to learn in order to value mechanicals more than material and sophisticated equipment.
Let’s take a common problem: many learners want to build robotic systems but don’t know where to start. They could believe that they must have 3d printers or laser cutters. Not so. Beginning with cardboard gives you confidence to experiment and makes sure that you can perfect what you are on before you decide to make it using a higher cost material.
Understanding the Robot Arm Structure
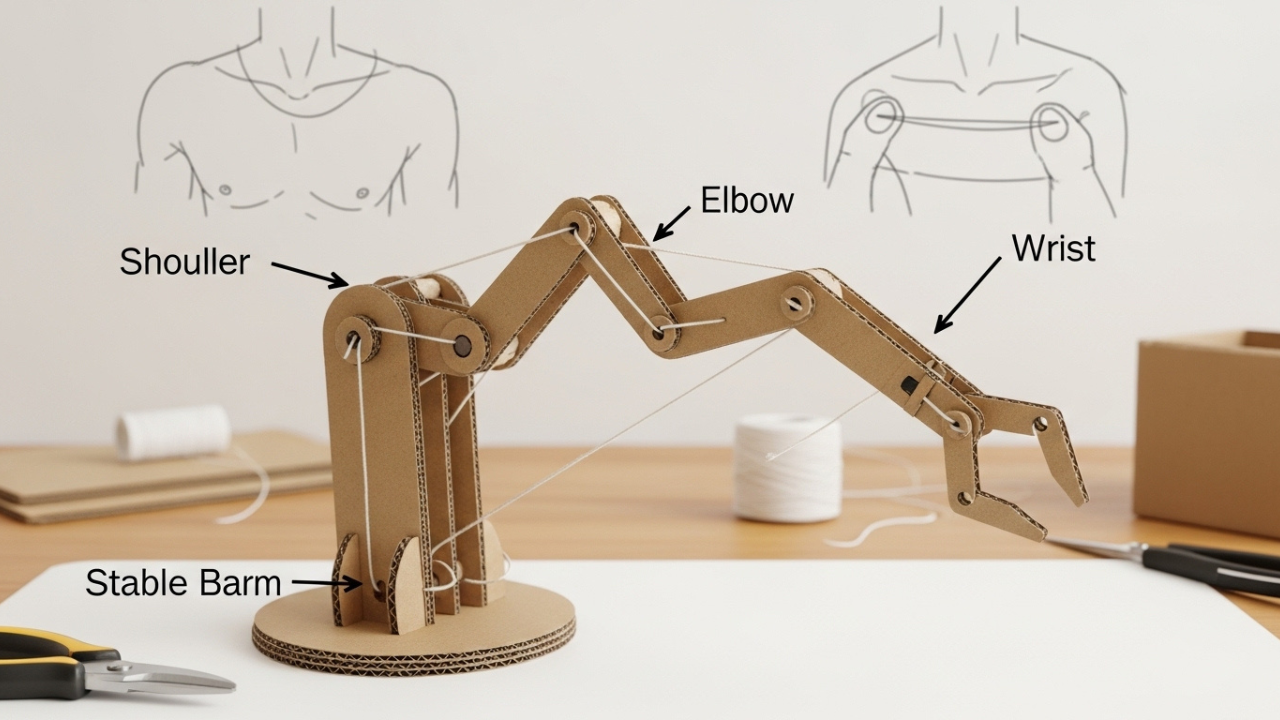
Before you begin, it’s essential to understand the parts of a robot arm. Most designs follow a basic layout:
- A stable base
- One or more arm segments
- Bend-able or rotational joints
- A gripper or claw (usually) ends effector
That means thinking about levers, pivot points, and how one part will pull or push another.
Imagine a puppet controlled by strings. That’s not far off from the way some simple cardboard arms work. You can simulate muscles using string or thread, run through holes or loops, pulled manually or even by small motors if you’re feeling adventurous.
Planning Your Build
Start with a sketch. Think of it like a blueprint—not just for how it looks, but how it moves. How long will each segment be? How many joints do you want? Will it be controlled manually, or do you want to try motorized movement later?
The basic designs tend to work without complication. They can use a two-segment arm featuring a claw to figure out the fundamentals. The angles used should be kept realistic because tight or loose joints will not give the arm a fluent movement.
Gravity designed. A base that is too heavy will create difficulty, thus weighing the top to be heavier than the bottom will create instability, therefore make provisions on how to balance the weight.
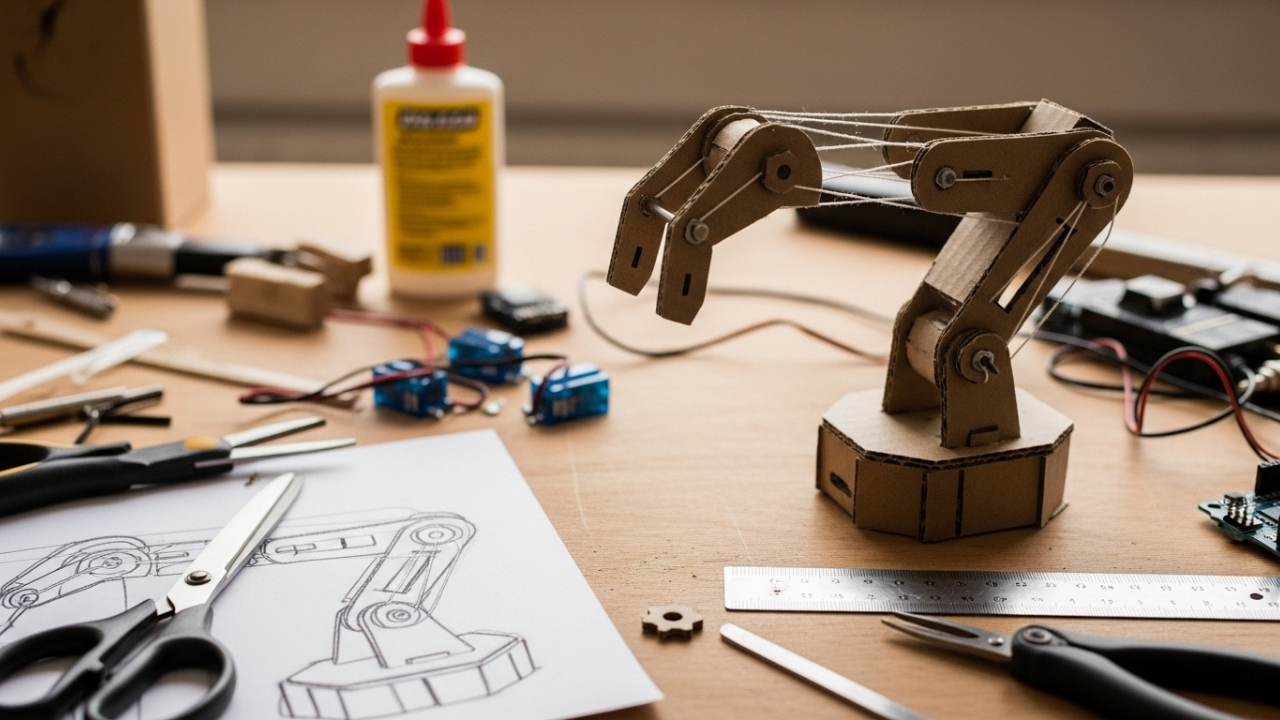
Choosing the Right Cardboard and Tools
Not all cardboard is equal. Weight bearing places or pieces of a major frame should be made of two-fold corrugated cardboard. Thin cardboard (such as cereal boxes) is good on the covers or bendable items.
Simple equipment ought to have craft knife or scissors, heavy glue (the hot one can be recommended), a ruler, pencil, string, straws or skewers as the hinges, and tape. Before you start, keep everything in order. This will result in errors and frustration when there is clutter in the working space.
Cutting and Shaping Your Parts
When you cut, think as a builder, not a cutter. Clean lines and good angles determine the strength of the arm. Reinforce long arm segments by folding edges to form a channel or box shape. This adds strength without much weight.
Use straws or skewers as axle points for joints. Thread string through them to simulate tendons. These little details do not make a big impact until you move your arm and start moving it.
Spend time at this step. Measure before you cut, check your piece to be fitted before you cut, and cut slowly. Error committed in this area will reflect itself later, so it is a worth it.
Building the Frame and Joints
Let’s start with the base. It should be flat and wide, like a strong foundation. If the base tips or shifts, the arm will fail. Glue several layers of cardboard together if needed. Once you have the base, begin attaching your first arm segment using a pivot joint—this can be a simple straw or skewer poked through both the base and the arm piece.
The elbow joint comes next. Think about how your real elbow moves—it’s a hinge, not a full rotation. Apply the same strategy to another connection between the first and the second arm segment. Tape or glue each joint so it does not move freely, yet allows the joint to have freedom.
When a joint is overtightened, it snaps; when it is under tightened it cannot be in position. At this stage you should have an object that can resemble a mechanical arm-at least not moving yet. That’s fine. Structure comes first. Movement comes next.
Adding Manual Movement
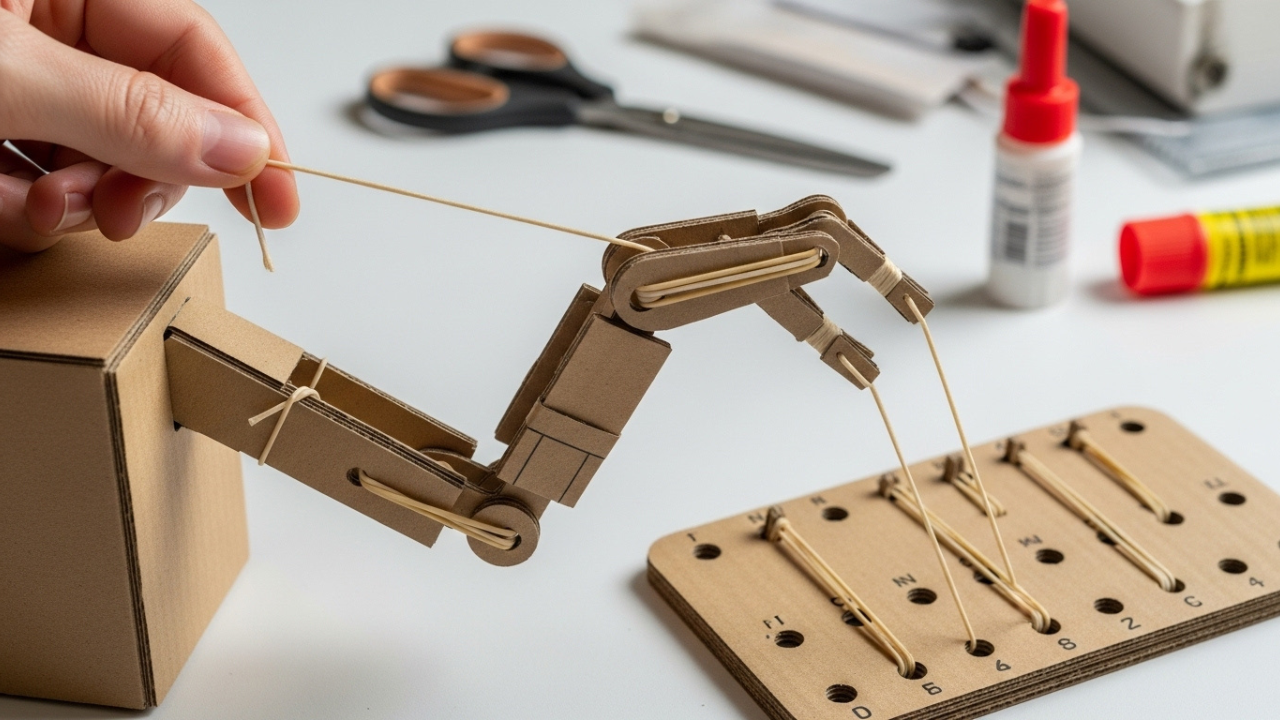
Now comes the fun part: getting it to move. This is where you introduce string and elastic bands. Attach strings to the joints and run them down the arm, just like muscles running down tendons. When you pull the string, the joint bends. When you let go, elastic bands can pull it back to place.
Try it first with one joint. Pull the string slowly. Adjust the tension. When it glues or fails to go in well it indicates friction or misalignment. When you find that one joint worked, then try another.
Adding multiple joints means you’ll need to label your strings and keep them untangled. A control board made of cardboard with labeled holes can help you manage this.
Testing, Tuning, and Troubleshooting
Test your arm often. It is not a good idea to wait until you complete everything to discover that it is not working. Delivery ought to be fluid. If a joint feels tight or grinds, loosen it slightly. If it flops, strengthen it with extra cardboard or better alignment.
They include troubleshooting. You are not failing you are learning how to do it better. Look out of deformity such as warping, twisting or weakness. Each of them can be corrected with minor adjustments.
Basic Troubleshooting Tips
| Problem | Possible Cause | Fix |
|---|---|---|
| Joint is too stiff | Glue is blocking movement | Recut or loosen the joint |
| Arm segments bending | Cardboard too thin | Reinforce with folds or layers |
| Strings not pulling smoothly | Friction or tangling | Use smooth straws and guide holes |
| Base tipping | Top-heavy or unstable base | Widen base or add weight to bottom |
Evolving the Build: From Basic to Functional
At this point, you are meant to have in your possession a first working prototype; a cardboard arm that can move a tad. It is not a perfect phenomena, it is real, and you made it. That is something most people never do. In this second part, we’ll take that prototype further. You’ll learn how to improve the design, explore simple automation, and even add a gripper that can pick up objects. The goal now is to make it useful, smooth, and maybe even a little bit impressive.
Improving Structure and Movement
Let’s start with what you already have. Take a close look at your arm. Are the movements smooth? Does it bend as intended? If not, look at where it struggles. Adding more strength to your segments might help. Reinforcing the pivot areas with extra cardboard or small washers (cut from card) can reduce friction and give better rotation.
Redesign your joints if needed. Consider replacing skewers with thin bolts or better straws. Add spacers to reduce wear and tear. You can also increase the control by creating a simple joystick-like interface using cardboard paddles that pull strings.
Adding a Gripper: The Hand of the Arm
A robot arm becomes much more interesting when it can grab something. A basic gripper can be made from two flat pieces of cardboard attached like pincers. Use string to pull them closed, and elastic bands to open them back up when released. You can mount this at the end of your second arm segment.
If you want to level it up, try a claw design where the fingers are connected to a single pivot, closing in unison. Cut the pieces so they’re slightly curved to create a firm grip.
Getting Into Motion: Introducing Servo Motors
If you’re ready to move beyond manual movement, consider adding servo motors. These small, affordable motors work well with Arduino boards and can rotate to specific angles. Use them at joints where precision matters—like the elbow or gripper.
To connect a servo motor to your cardboard structure, mount it onto a small platform built into the joint. Attach the motor’s arm (called a horn) to your cardboard segment using glue or tape. You may need to experiment with alignment to get the movement just right.
A simple Arduino sketch can control the motor angles. Even basic code can help you automate repetitive motion or trigger sequences with a button.
Expanding Control: Basic Electronics
Don’t be afraid of basic electronics. With an Arduino board, USB cable and some jumper wires, you can drive several servo motors. You also will require a source of power and most of the time it is a battery pack. You will be able to control the movement of every joint, put some limits or activate the movement by means of sensors or buttons with a little basic coding skills.
If coding is new to you, look up simple examples of Arduino servo control. Libraries like “Servo.h” make it easy to get started. Just a few lines of code can move a motor, and tutorials are widely available.
Real-World Applications and Experiments
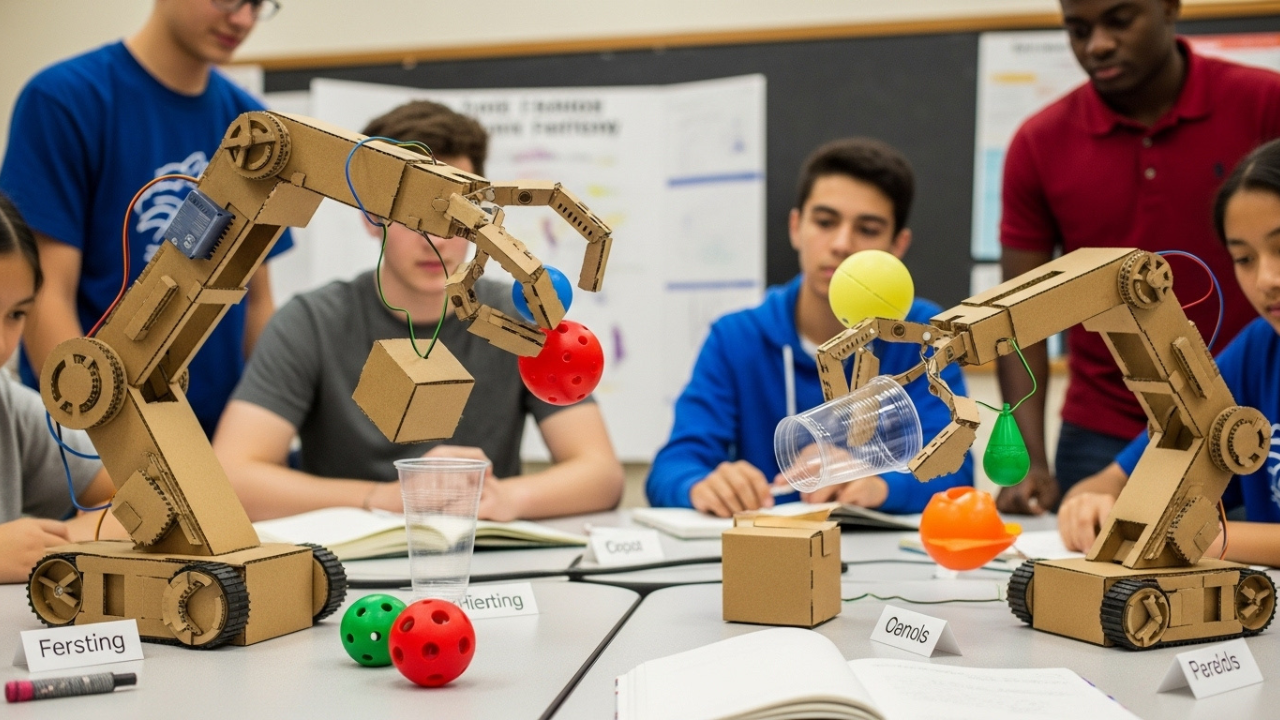
Once your robot arm moves and grips, the door opens to fun experiments. Try picking up objects of different shapes and weights. See how far it can reach. Add a weight to the end and test its limits. These experiments will make you understand balance, the power of torque and structure manually.
Your prototype could also be used in a classroom demonstration, science fair project or an engineering problem. Build a second arm and try mimicking tasks. Teach others how you built it. Sharing the project is part of the joy.
From Cardboard to Permanent Materials
You may also consider the idea of making your design harder materials once you have tested it. A foam board, plastic sheets or even a wood can be cut and shaped similarly. You now have a blueprint and a working prototype. That gives you a huge advantage—you know what works.
Use your cardboard parts as templates. Mark and cut your new materials based on what you already tested. Or you can do a little mix and match- cardboard in some places and plastic or aluminum in others.
Final Troubleshooting and Performance Tuning
As your arm grows more complex, tuning becomes more important. Calibrate the servo angles. Balance the arm weight with counterweights at the base. If anything starts to wear out or break, trace the problem and fix it early. Keep testing under different conditions.
Sample Servo Angle Table
| Joint Name | Suggested Angle Range |
| Base | 0 – 180 degrees |
| Elbow | 30 – 150 degrees |
| Gripper | 10 – 90 degrees |
These ranges give you good control without overextending the motors.
My Opinion
You started with cardboard and imagination. Now you have a moving, working robotic arm—maybe even automated. That’s not just craft. That’s engineering. It’s the mindset that turns ideas into action.
Keep iterating. Try new joints. Add new movements. Connect it to sensors or voice commands. You’re no longer just a beginner. You’re a builder. And this is just the start.
