


If you’ve ever built a DIY robot and tried to test it on your living room floor, you probably know the feeling: one minute it moves perfectly, and the next it’s stuck under a couch or veering off into a pile of shoes. It’s frustrating, and worse — it’s unpredictable. That’s why serious builders, even at the hobby level, take the time to create a robot testing station.
A testing station isn’t about showing off your setup or having a lab full of fancy gear. It concerns providing a trustworthy environment where you can look at, quantify, and enhance the behavior of your robot without the environmental condition concealing as to what is really happening. When your robot breaks down you do not want to wonder whether it is an error or it was just the lighting that was funny or the floor was slippery.
In this article, you’ll learn how to build your own robot testing station from scratch. If you have a bedroom, a garage, or a corner of a classroom, giving you some space to perform, this guide will take you through the planning, construction, and use of an actual working system that makes your robotics work easier.
Key Takeaways
-
Robot testing station provides you with a controlled environment to debug, measure and work on your bots.
-
Simple materials — foam board, tape, clean lighting — can create a powerful test environment.
-
Testing zones help simulate real challenges like obstacles, lines, or walls.
-
Recording footage and keeping logs helps you identify patterns and bugs.
-
Your station grows with your skills — start basic, and improve it as your robot evolves.
Why a Testing Station Makes a Huge Difference
Robots rely on sensors, and sensors rely on their environment. That’s where most testing problems begin. If you place your robot on a shiny floor, an IR sensor might get false readings. If it’s too dark, a light-following bot might act confused. And if the surface isn’t consistent, your wheel traction might vary from one spot to another.
This is the root of most “random” errors in robotics — the kind that appear and disappear without explanation. Without a consistent testing environment, even the best code can seem faulty.
When you test your robot on the same surface, in the same light, with the same obstacles or lines, every result becomes more valuable. You can track real changes. You can spot real bugs. And maybe most importantly, you can test without constantly picking your bot off the floor.
Understanding What You’re Building
A robot testing station does not have to be fancy, nor costly. In the simplest form, it is merely a flat surface with definite limits that permits your robot to move, turn, and carry out duties without colliding unforeseeable environmental parameters.
The true strength of it is that it offers repeatable conditions. What you are doing is taking your robot somewhere he can act predictably, when something does go wrong you will know it is not the floor or the lighting or a passing shadow that is causing it.
What Kind of Station Do You Need?
The type of station you build depends entirely on your robot’s function. For example:
-
A line follower needs a high-contrast surface — usually white with black tape paths.
-
An obstacle-avoider benefits from flexible barriers or moveable walls.
-
A robot which will solve the maze will have to have a layout that mimics right turns, dead ends, and closed looping.
Irrespective of these differences, however, there is the same common purpose: to eliminate chance and impose order, enabling a controlled environment to be created.
Picking the Right Spot for Your Station
Before gathering materials or cutting boards, figure out where your testing station will live. The best location is one that fits your robot’s size and gives you a consistent space to work in.
Choosing the Right Environment
Table top or even desk would suffice in the instance of small robots. With more bots, you may be required to create something foldable and storable especially when you can be working in a common place like a bedroom or living room.
Frequency of ten plus is relevant rather than size. Garage corners, spare desks, and even the floor of a closet can work well as long as they provide:
-
Flatness
-
Good lighting
-
Access to power
-
Freedom from foot traffic or clutter
Don’t underestimate the value of testing in the same spot every time — your robot’s sensors will thank you, and your debugging process will get much easier.
Materials That Get the Job Done
You might think building a testing station means buying new tools and supplies. As a matter of fact, most constructors make use of materials available to them at hand.
Your base could be a large piece of foam board, piece of plywood or even thick cardboard. The point is ensuring that the surface is flat, clean, and that it is able to be sensed.
Choosing the Right Surface
If your robot uses IR or light sensors, a white surface is often best — it provides strong contrast when paired with black tape. If you’re testing wheel traction or motor behavior, a slightly textured surface gives more realistic resistance.
For boundaries, you can use anything from wooden strips to foam pool noodles. The purpose is simple: keep your robot from rolling off the edge. If your robot has cliff sensors or edge detection, you might not need walls at all. But early in development, a few inches of border can save you a lot of chasing.
You don’t need perfect materials. You just need predictable ones. Clean, stable, and repeatable surfaces help you trust your tests — and that’s what makes the station so valuable.
Building Your Base and Frame
Once you’ve got your surface, place it on something stable. If it slides around, even slightly, it can throw off navigation tests. Use adhesive pads or place the whole thing on a non-slip mat. If you’re working on a table, make sure the surface extends far enough to prevent the robot from falling off an edge. That’s more common than you think — and often expensive.
Adding borders is simple. Soft foam strips or scrap wood pieces can be glued or taped to the edges. Some builders go one step further and build a shallow box, giving the robot a mini-arena to move inside. For modular setups, Velcro works surprisingly well — you can reposition walls, obstacles, or track pieces without rebuilding from scratch.
A simple paint job or color overlay can help you simulate test zones — think green for “safe,” red for “stop,” or blue for “docking.” You don’t need perfection here. You just need clarity — for the robot and your own eyes.
Budget vs Premium DIY Station Setup
Here’s a quick comparison to show what you can expect to build at different budget levels:
| Component | Budget Option | Premium Option |
|---|---|---|
| Surface | Foam board, cardboard | MDF board, anti-static mat |
| Borders | Cardboard, foam strips | Wooden rails, magnetic modular edges |
| Lighting | Desk lamp or natural light | Adjustable overhead LED panel |
| Track Markings | Electrical tape | Pre-printed test mats or vinyl stencils |
| Camera Setup | Smartphone on tripod | Overhead webcam mount with recording |
Even at the budget level, you can create a testing station that massively improves your workflow. The key is in the consistency, not the cost.
Keeping the Surface Sensor-Friendly
The most overlooked part of building a station is how much your robot depends on the surface for input. Whether it’s infrared reflection, color tracking, or wheel traction — the surface is what your robot sees and feels.
For best results:
-
Keep the surface clean — even dust can affect sensors
-
Avoid shiny or mirrored finishes — they reflect light unpredictably
-
Choose colors that contrast well with your robot’s detection tools
-
Make sure the surface is level — especially if you’re logging performance
You’ll find that once your robot behaves well in this space, it becomes much easier to isolate real issues from environmental noise.
Testing Robot Behavior in a Repeatable Way
The biggest benefit of a dedicated station is the ability to replicate conditions. That might sound technical, but it just means this: if your robot performs well once, you want to know it’ll perform the same way again.
To do that, you need to test with purpose. Random driving isn’t enough. Set up clear start and end zones. Use visual markers or color-coded areas to give your robot consistent points of reference. Time your robot’s actions. Measure how long it takes to follow a line, turn around a corner or dodge around a block.
Such measurements do not have to be precise. Even basic timing with a phone stopwatch or visual logs from a smartphone camera can tell you if something’s improving — or getting worse.
Repeat your tests. Don’t change variables between runs unless you’re testing a fix. If your robot fails one out of five times, you’re already getting useful data — and your station is doing its job.
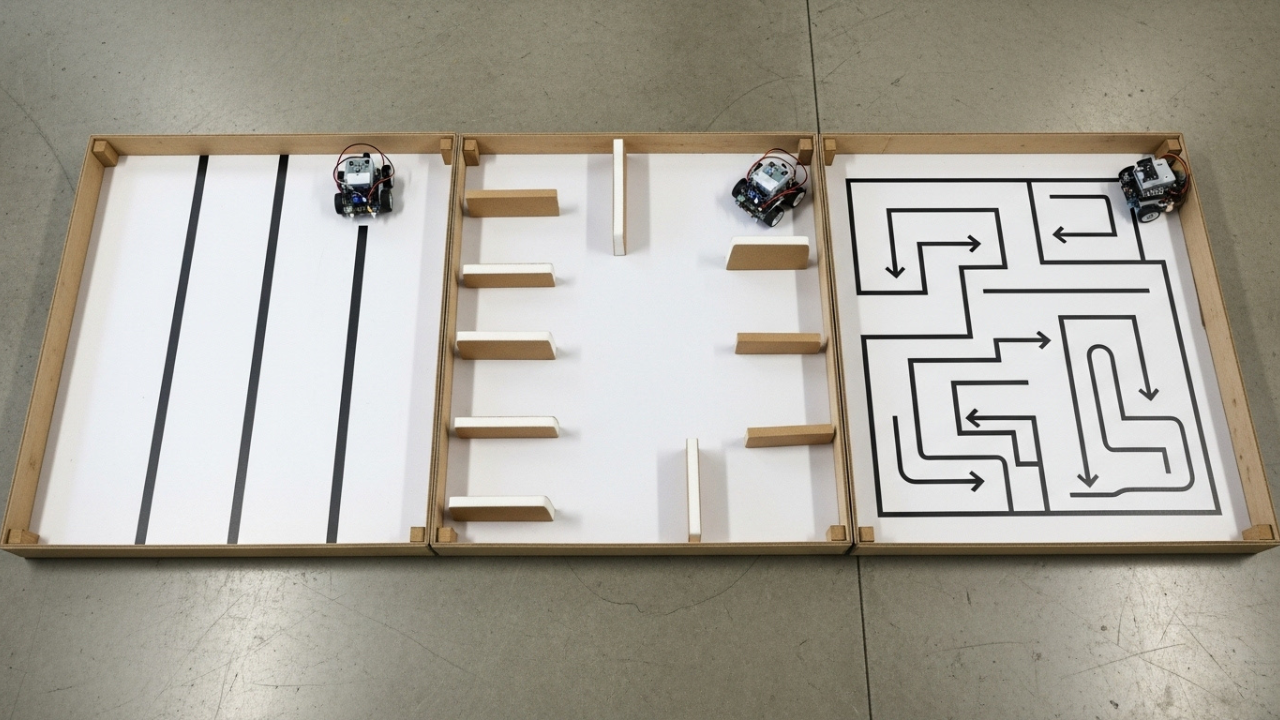
Simulating Real-World Challenges Inside a Simple Station
Your robot might one day navigate a room, explore a maze, or deliver items across uneven floors. But first, it has to prove itself on your test bench.
That’s why it’s useful to build small, task-based setups inside your station.
For example, if your robot uses line-following logic, lay down multiple curves and junctions. If it’s designed to avoid obstacles, create a small arena with moveable barriers. A few foam blocks can simulate a hallway. Empty boxes can become walls. Masking tape can act as borders. The idea is to start simple and slowly introduce complexity as your robot becomes more capable.
You’re not trying to make life hard for your bot — you’re preparing it for what comes next. And the best place to do that is somewhere you control every variable.
Managing Power, Lighting, and Safety
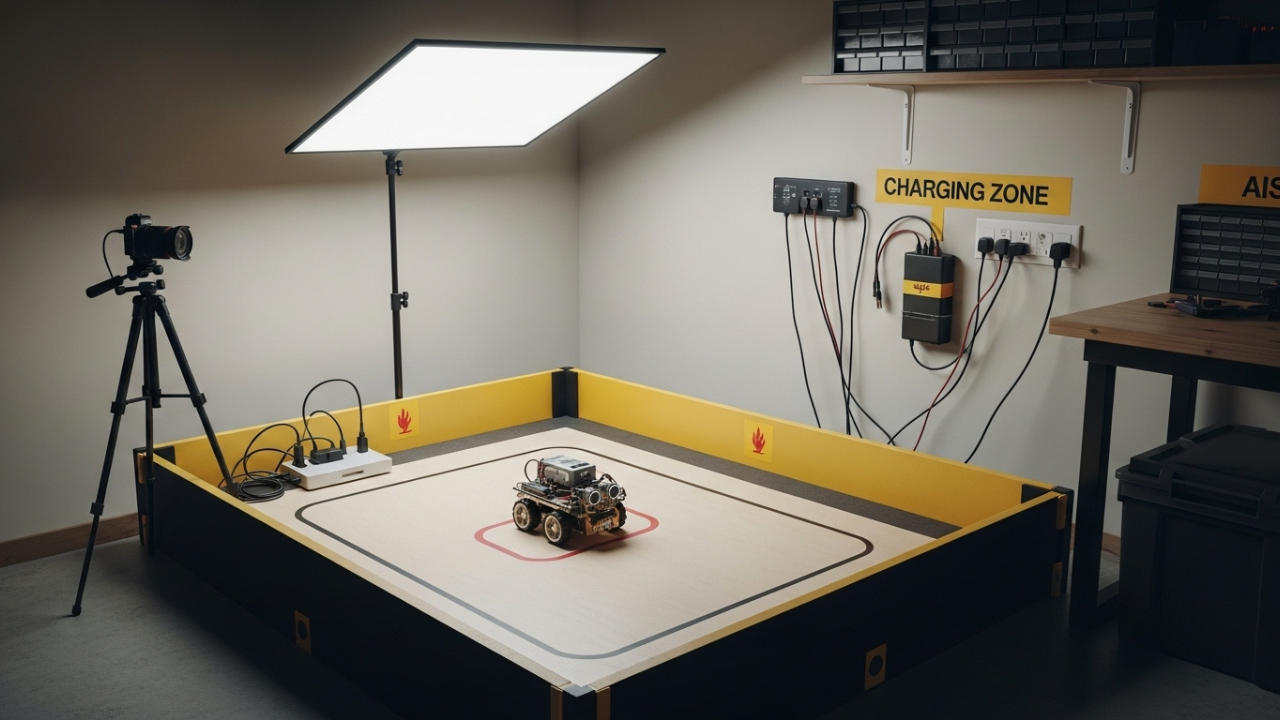
As your robot evolves, it may need more power or generate more heat. So your testing area should evolve too.
Make sure your station gives you easy access to power — whether that’s a nearby wall outlet, a portable battery station, or even a USB hub with multiple ports. If your robot needs charging between tests, build that into your routine. Some makers add a dedicated charging zone to the station so they don’t have to move the bot between every run.
Lighting is another detail that matters more than it seems. Overhead light should be even and diffused. Avoid strong shadows or bright spots, especially if your bot uses light sensors or vision. If you’re using a camera for tracking, keep the light consistent across tests — otherwise, the same test can produce different results depending on the time of day.
Lastly, safety matters — for your robot and your workspace. If your bot uses heat elements (like soldered connections), avoid flammable surfaces. When it is heavy and fast, ensure that borders are tough enough to prevent it without breakages. This may appear extra precaution, but a proper setup at the moment will save expenses in the future.
Creating Zones and Obstacles for Targeted Testing
Once your station is functional, it’s time to personalize it based on your robot’s abilities.
Let’s say your bot is supposed to detect and avoid walls. Set up a maze-style corner with angled obstacles. Run it multiple times from different start angles. Observe whether the reaction time stays consistent.
Or maybe your bot is designed to follow colored paths. Use printed color patches or colored LED strips on the floor. See how different lighting affects its sensor input.
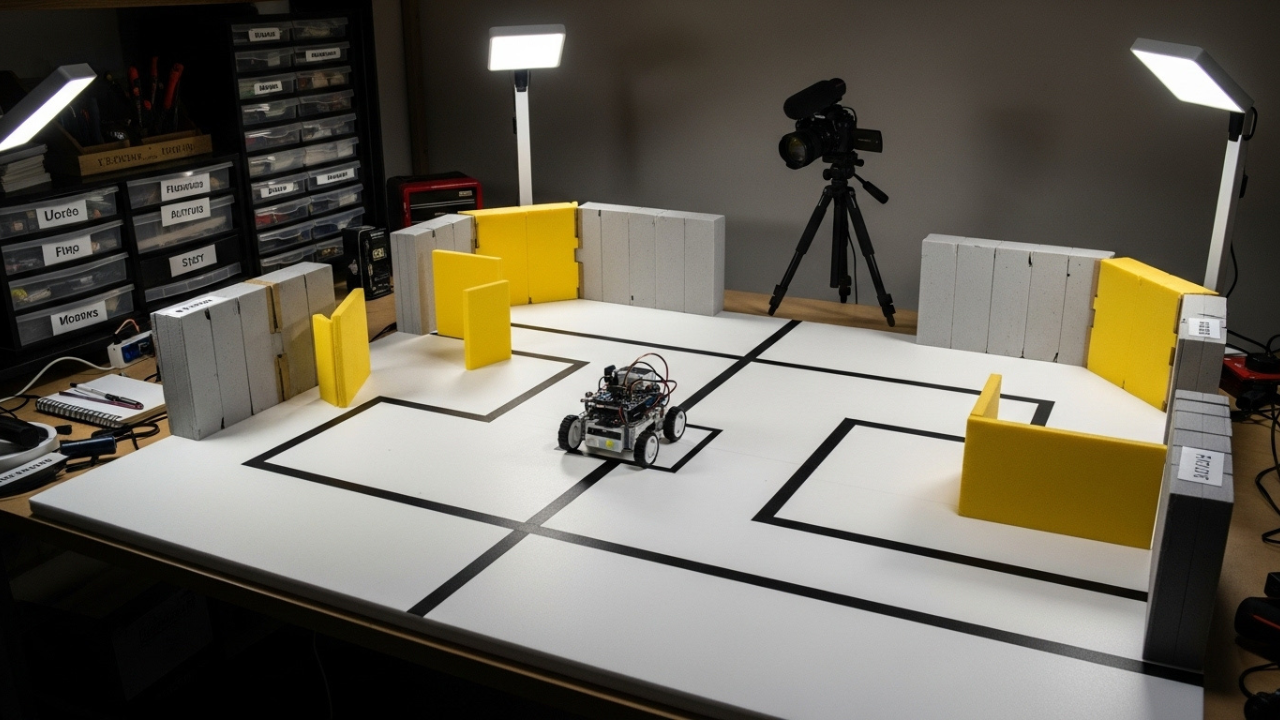
Here’s an example of how you might lay out different zones inside your testing station:
-
The left half simulates a hallway with walls for navigation tests.
-
The center is a line-following track with a curve and a T-junction.
-
The right side has open space and colored zones for visual recognition.
You don’t need fancy materials. Print out targets. Use paper cones as obstacles. Reuse toy bricks as corner walls. Just make sure everything can be repositioned easily so your tests don’t always follow the same path — unless that’s the point.
Using Cameras and Logs to Boost Your Observations
When testing robots, our own eyes sometimes lie. You think your bot turned late, but maybe the sensor lagged. You think the battery drained too fast, but maybe a motor stalled.
This is where a simple smartphone or webcam setup becomes your best friend. Mount a camera above your station. Record your tests. Watch them back at half speed if needed. You’ll often notice things you missed in real time.
Even better, pair your footage with a behavior log. This can be a handwritten notebook or a spreadsheet. Record test number, what you changed (if anything), and what the outcome was. After 10–15 runs, patterns will start to emerge — and they’ll help you improve much faster than testing randomly.
When Things Go Wrong — And How the Station Helps
Let’s say your robot starts spinning in place halfway through a path test. Without a controlled station, your first thought might be: “Maybe it hit something.” But inside your testing area, you know the surface is flat, the path is clear, and the layout hasn’t changed.
That narrows your focus. You can now rule out environmental causes and start checking your code, your wiring, or your logic flow.
This is where a good station really earns its value. It removes the noise. It gives you a baseline. It turns vague bugs into traceable problems.
And every time you test, you’re not just collecting data — you’re building confidence.
Keeping Your Station in Good Shape
Over time, your station will wear in. Tape might peel. Boards may bend. Obstacles get scuffed or lost. That’s okay. But it’s smart to treat your testing station like a tool — something that deserves upkeep.
Clean the surface regularly, especially if your robot uses sensors that rely on reflectivity or color accuracy. Store your pieces neatly. Label sections if needed. If you use a modular layout, take photos so you can recreate test conditions later. The more you treat your station like a serious piece of your workflow, the more value it gives back.
Final Tips for Leveling Up
Every robotics builder has different needs. A line-following test may not help someone building an AI assistant. But almost every bot — no matter how smart — benefits from being tested in a known, repeatable space.
As your skills grow, your station can grow with you. Add things like:
-
Motion tracking markers for vision-based bots
-
Audio cues or light triggers for stimulus-response testing
-
Elevated surfaces to simulate ramps or stairs
-
Modular puzzle elements for pathfinding algorithms
You don’t have to build everything at once. Start small. Let your robot guide the upgrades. And don’t be afraid to rebuild as your projects evolve.
